

Everything you need to know to create your seating chart.
Your wedding seating chart is one of the last BIG planning to-do’s you and your partner will tackle before your big day. While it may seem like a daunting task, with careful planning and a dash of creativity, you can create a seating chart that ensures everyone has a memorable and enjoyable time. In this blog post, we’ll walk you through the steps to create the perfect wedding seating chart.
Step 1: Finalize your guest list
The first and most crucial step in creating a seating chart is to finalize your guest list. Make sure you have a list that includes the first and last names of all your guests, their RSVP status, their meal choice if serving a plated meal, and any dietary restrictions or special accommodations they may need.
As you’re approaching your RSVP date feel free to send friendly reminders to anyone who hasn’t responded. FYI – most online RSVP services allow you to send an automated reminder to your guest list! Once your RSVP date has passed, we recommend reaching out to any non-responders via text or call.
Step 2: Determine the layout
Before you dive into the actual seating chart, you need to decide on or finalize the table layout for your reception. As your wedding planners, we will create your reception layout for you and update it once we have your final guest count and seating chart.
As we’re building out the layout of your wedding reception, we’re considering the size and shape of your venue, as well as the number of guests you’re expecting. We also ensure to include a dance floor (either in a physical dance floor or by leaving space for dancing), a bar(s), a cake table, a welcome table, a photo booth, and a DJ table or space for a band.
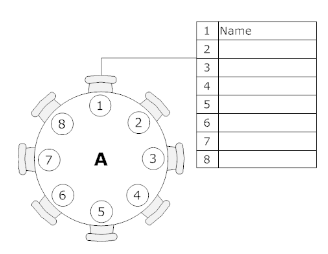
Step 3: Create a Seating Chart Template
Once you have a clear idea of your table layout, create a seating chart template. You can use planning programs such as Aisle Planner or Microsoft Excel. List all the tables and create placeholders for each guest, indicating their assigned seat.
Examples below:
Table 1
- Seat 1: Guests first & last name
- Seat 2:
- Seat 3:
- Seat 4:
- Seat 5:
- Seat 6:
- Seat 7:
- Seat 8:
Step 4: Group Guests Strategically
Now comes the fun part: strategically grouping your guests. Consider these tips:
Family and Close Friends: Place immediate family members, such as parents and siblings, at a central table close to the bride and groom. Seat close friends and bridal party members at nearby tables.
Mix and Match: Create a balanced mix of personalities and interests at each table. This will help spark conversations and create a lively atmosphere. Avoid seating guests who may have conflicts or tensions next to each other.
Step 5: Consider Table Sizes
Connect with your rental vendor (catering, rental company, or venue) to determine the table sizes available to you. You’ll want to ensure you are seating an appropriate number of people at each table. The most common number of guests per table is 8 but you do have some flexibility in how many people you seat at each table.
Here is a quick cheat sheet for the ideal number of seats for the most common table sizes.
Round Tables:
- 60” – 5-8 guests
- 66” – 8-10 guests *most common
- 72” – 9-11 guests
Rectangle Tables:
- 6 ft rec – 2-3 per side
- 8 ft rec – 3-4 per side *most common
Step 6: Be Mindful of Seating Arrangements
When arranging the seating chart, keep the following in mind:
- Place guests with mobility issues close to restrooms and other amenities.
- Seat elderly guests farthest away from the band or DJ as possible.
- Pay attention to the flow of service and avoid placing tables in high-traffic areas. (You’ll need to know where the catering kitchen is located.)
- Ask your parents to weigh in. They may be aware of dynamics between guests that you might not know.
Step 7: Displaying your Seating Chart
Once you’ve finalized your seating chart, it’s time to figure out how you will communicate it to your guests on your wedding day. Most couples opt for either escort cards or a printed seating chart. Check out our Wedding Day Signage Guide for more information on escort cards vs. seating charts (and more day-of signage!).
Looking for more seating chart or escort card design inspiration? Check out our Seating Chart, Escort Cards & Place Cards Board on Pinterest!
Step 8: Inform your Vendor Team
Once you’ve sat all of your guests you will want to provide your planner and caterer a document including each guest’s full name, table number, meal selection (if you’re having a plated dinner), and any allergies or dietary restrictions. They will need this information at least 20 days prior to your wedding!
Below is an example of a plated dinner:
| First Name | Last Name | Table # | Meal Selection | Allergy |
Creating a wedding seating chart may require some time and effort, but it’s an essential part of ensuring that your guests have an enjoyable experience. By following these steps you can create a seating chart that contributes to the overall success of your wedding celebration. Happy planning!


